1.Introduction:
Invoice Verification is a process which confirms in SAP that an invoice has been received by the Department.
Goods receipt will have to have been entered on SAP prior to invoice verification unless that process has been by-passed at the raising of the purchase order.
2.Verify an invoice:
Use the menu path:
Logistics> Materials Management> Logistics Invoice Verification>Document Entry>MIRO – Enter Invoice
T code: MIRO
2.1. Enter Invoice Data:
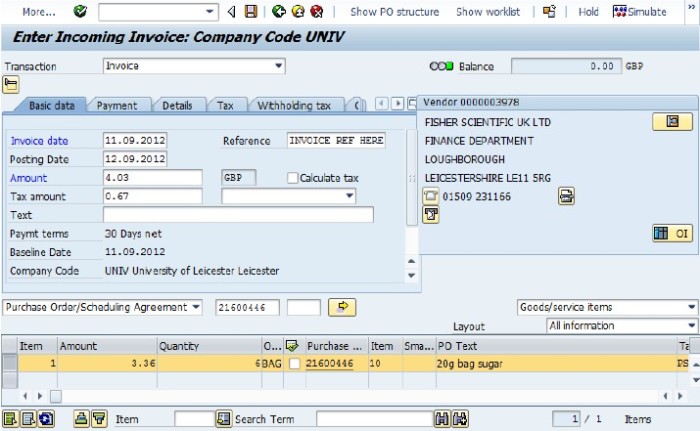
On the Basic Data tab in the Header data section enter the following information
⇒ Invoice date: Enter the date printed on the invoice document
⇒ Posting date: This will display the current date
⇒ Reference: Enter the invoice number from the invoice document in the same format as it is on the document. As this is a required field, if you do not have an invoice number, enter something meaningful to refer to the invoice.
⇒ Amount: Enter the total amount from the invoice this includes any delivery and VAT. This is sometimes called Gross Amount or Invoice Total
⇒ Tax amount: Enter the VAT amount from the invoice
⇒ Calculate Tax: Leave this field blank
⇒ PO Number: In the lower half of the window (under the Header Data section) make sure that Purchase Order/Scheduling Agreement has been specified. This is usually the default selection.
In the field to the right of this, enter the purchase order number from when you placed the order. If you know that the invoice is for a particular line item then this can be entered in the box next to the purchase order number.
If the invoice refers to several purchase orders, the purchase order numbers can be entered by selecting the More allocation criteria button (button with a yellow arrow). This opens a window which allows you to enter more purchase order numbers. Enter the purchase order numbers in the left hand column and press the Adopt button to proceed.
⇒ Checking the vendor payee details:
Check the vendor details on the invoice against the vendor details that have appeared automatically from the purchase order.
If the vendor details are different:
1. delete the lines in the original purchase order (please see Changing or deleting previously created purchase orders section in the Create Purchase Orders guide)
2. raise a new purchase order to the correct vendor
3. verify the invoice using this new purchase order
If the details on the invoice match the defaulted information, then proceed to verify the invoice.
2.2.Verify the invoice:
1. Details of the line items with their net prices will have automatically into the Invoice verification window from the original purchase order. It is usual for every line to be selected (indicated by the box to the left of each line being a darker grey). The current line item will be in yellow (not white as might be expected).
2. Where there is a difference in the quantity or the amount to the invoice, adjust the amount and quantity entries for the line items to match the invoice by placing the cursor in the Amount and Quantity fields and overtyping the entries.
3. Deselect any items that are not on the invoice you have received by clicking in the box to the left of each line. You may find it helpful to use the Select all  or Deselect all
  icons at the bottom of the screen
2.3.Simulate the posting of the invoice:
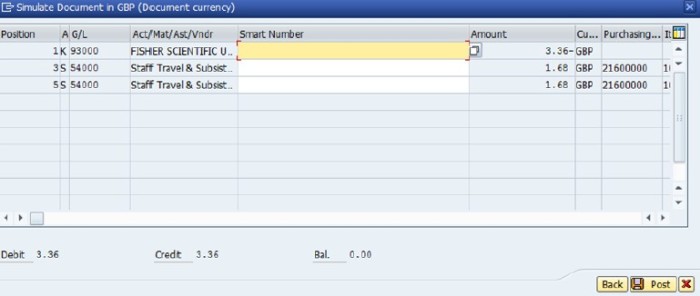
1. Click on the Simulate  button to view the document you are about to post. This will show you if your invoice and purchase order balance.
2. The Simulate Document in GBP should appear as shown below. If this box does not appear it is likely that there is a message at the bottom of the screen (for example when the due date is in the past), if this occurs, click on the green tick button at the top left of the screen to proceed to the Simulate Document in GBP box.
In this screen check the following:
Each of your line items should be against its own ledger code.
The Debit should equal the Credit, and the Balance at the bottom should be 0.00.
If the simulation is correct and the invoice and purchase order balance you can proceed to Post the invoice for payment.
However, if the invoice and purchase order don’t balance Enter Accounting Document: Check Tax Data screen appears, proceed to con and make your corrections.
Check the tax amount. If the warning message Invoice document still contains messages (see error log) appears, proceed to Process error messages.
If the simulation is not correct, go back to the Invoice Verification screen by clicking on the Back icon and make your corrections.
2.3.1.Check the tax amount:
When simulating the posting of the invoice, if the tax amount is incorrect, the following Enter Accounting Document: Check Tax Data screen will have appeared instead of the simulate screen:
and a message will appear at the bottom of the screen, for example:
Check that the tax amount you entered onto SAP is the same as the tax amount on the vendor’s invoice. If the tax amount you entered matches the vendors invoice, then Enter to proceed with the simulation.
Note: the tax amount entered must always be the amount on the vendor’s invoice.
2.3.2.Process error messages:
When simulating the posting of an invoice, if the warning message
appears instead of the simulate screen, click on the Messages button .
Note the Verification log Message text, Enter to return to the Invoice Verification screen and make the appropriate change to the verification entry. Note the traffic light status on the Messages button:

The example above indicates that there is an outstanding balance of £3.63 that needs to be resolved first.
2.4.Post the invoice for payment:
1. Click on the Post button to post the invoice for payment.
2. This takes you back to the Invoice Verification screen ready for the next invoice. The document number is given at the bottom of the screen. Every time SAP carries out a function it creates a unique document number within a range. The number range for invoice verification starts with 52……..
3. Use the rubber stamp on the invoice and write in the document number SAP produces in the box marked Document no and obtain the appropriate signature to authorise the invoice for payment.
4. Send the verified and authorised invoice to the payments office to unblock it and pay the vendor.
Note: Since the payment of invoices is driven by the Finance Office and not directly from the departmental entry all invoice payments will be blocked until the paper copy arrives in Finance with the appropriate authorisation.
3.Reverse Invoice Verification:
1. Use the menu path:
Logistics > Materials Management > Invoice Verification > Logistics Invoice Verification > Further Processing > Cancel Invoice
T code: MR8M

2. Enter the Invoice Document No. (Invoice Verification number, starting 52…) in the Invoice Document No. box. Enter the Fiscal Year if this has not defaulted in
3. Enter the Reversal Reason in the Details Re Reversal Posting section using the drop down list as shown below. Enter the Posting Date (this must be the date of reversal).

4. Click on the Save button at the top of the screen. You will then get a reversal number at the bottom of the screen (starting 52…). The message Please manually clear FI documents will also appear. This is because you will also need to cancel the purchase order (commitment).
See Changing or deleting previously created purchase orders in the Create Purchase Orders guide.
4.Credit Note Verification:
1. To verify a credit note go to:
Logistics > Materials Management > Invoice Verification > Logistics Invoice Verification
T code: MIRO
2. In the Transaction drop down box, choose Credit memo (for a full credit) or Subsequent credit (for a part credit)

3. Process as you would for an Invoice entering the date, reference, amount, tax amount and purchase order number
4. If you are entering a full credit (Credit memo), the amount and quantity from the purchase order will be defaulted into the Item overview section
5. If you are entering a partial credit (Subsequent credit), you will need to manually enter the amount and quantity
6. Click on the Save button at the top of the screen. You will then get a credit verification number at the bottom of the screen (starting 52…..)
Note: when you have finished entering a credit note, make sure you change the transaction box back to invoice or SAP will default back to Credit memo or Subsequent credit next time you try to enter an invoice.
5.Quick reference guide:
1. Use the menu path:
Logistics> Materials Management> Invoice Verification> Logistics Invoice Verification
T code: MIRO
2. In the Transaction field, select Invoice.
3. Enter the date on the invoice in the Invoice date field, the invoice number in the Reference field, the Amount, the Tax amount and the order number.
4. Match and make any changes to the cost of the items by selecting the line and changing the amount to the net amount on the invoice.
5. Simulate the posting of the document. This should balance to 0.00.
6. Save the verification.
Record the Document Number on the invoice ready for the payments office.
Frequently used transactions:
MIRO – Enter Invoice
MIR7 – Park Invoice
MIR4 – Display Invoice Document
MR8M – Cancel Invoice Document
MRBR – Release Blocked Invoices
MIR6 – Invoice Overview Automatic Settlement
MRRL – Evaluated Receipt Settlement (ERS)


