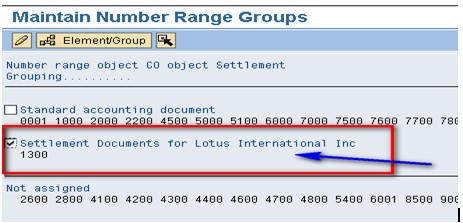
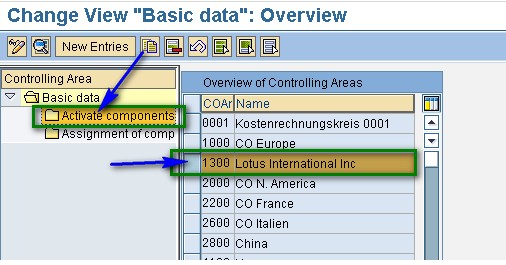
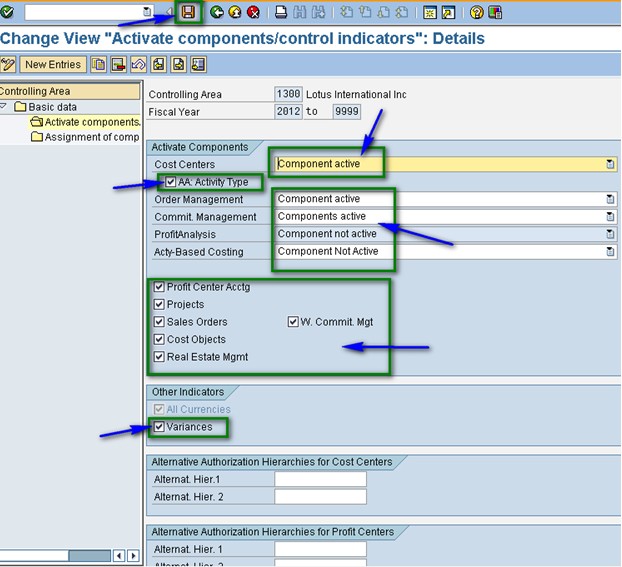
Note:
After you activate the multiple valuation approaches/transfer prices, it is not always easy to deactivate them again.
Currencies and valuations determine the functions of the transfer prices. In the currency and valuation profile, you must determine which valuation approaches are managed in which currencies. The legal valuation approach must be managed in the company code currency (currency type 10). You can decide whether the profit center and the group valuation approach are managed in the company code currency or in the group currency. To ensure a consistent update of the data, it is absolutely essential to use currency type 30 or currency type 10 as the controlling area currency in cases where there is an N :1 relationship between the company code and the controlling area. SAP Reference IMG > Controlling > General Controlling > Multiple Valuation Approaches/Transfer Prices > Activation > Set Up Transfer Prices in a Production.
Activities to be followed:
The following settings are essential in order to work with multiple valuation approaches.
- Currency and valuation profile
Using the currency and valuation profile, you must decide which valuation approaches you want to manage in the system. You can manage a maximum of three valuation approaches in two currencies in parallel. All valuation approaches that you maintain in the currency and valuation profile must also be managed accordingly in the material ledger. You can only execute a profit center valuation if you are using Profit Center Accounting. If you have defined the currency and valuation profile, you must assign this to a controlling area.
Customizing -> SAP Reference IMG > Controlling > General Controlling > Multiple Valuation Approaches/Transfer Prices > Basic Settings > “Maintain Currency and Valuation Profile” and “Assign Currency and Valuation Profile”.
- Create versions for valuations
In Controlling, the multiple valuation approaches are saved in the CO versions. As long as you are not using any transfer prices in accounting, use a current version “000” in the legal valuation. If you are using transfer prices, the operational version “000” saves all of the data (full version). The data of the multiple valuation approaches defined in the currency and valuation profile are stored in delta versions, which you must create.
The operational version represents the main Controlling approach that is used to control the company. You now need to define which valuation is managed in which version. You can decide whether the version “000” is managed in the legal valuation or in a parallel valuation. As a rule, you will manage the legal valuation in the version “000”. This setting is executed at controlling area level. You can check the consistency of the settings using the “Valuation” button. Customizing > SAP Reference IMG > Controlling > General Controlling > Multiple Valuation Approaches/Transfer Prices > Basic Settings > Create Versions for Valuations. If the version “000” is used to manage the legal valuation, this means that the sum total of the values from version “000” plus the delta version you created gives the transfer price.
- Material ledger
The material ledger (ML) provides a subledger for materials management. It forms the basis for managing multiple valuation approaches (ML manages the parallel inventory values) and MUST therefore be activated. First, you must set the material ledger to active in ML Customizing for the valuation areas. This tells the system that you intend to work with ML in the future. Important: You MUST activate the ML for ALL valuation areas/plants in all company codes of the controlling area in which the multiple valuation approach/transfer prices are to be activated.
Note: Do not make any postings in Materials Management (MM) and avoid other postings that refer to the ML until you reach the “Set valuation areas as productive” process step (see below)
You must then use the material ledger type to define the currency types you want to use in the material ledge. These currency types must correspond with those from the currency and valuation profile. If the currency and valuation profile only has two multiple valuation approaches (for example, a legal valuation approach and a profit center valuation approach), you can use the third currency field to maintain another currency. You must then assign the material ledge type to a valuation area.
Customizing -> SAP Reference IMG > Controlling > Product Cost Controlling > Actual Costing/Material Ledger, or Customizing > SAP Reference IMG > Controlling > General Controlling > Multiple Valuation Approaches/Transfer Prices > Basic Settings > Check Material Ledger Settings.
- Transfer prices in Profit Center Accounting (PCA)
a) Setting the profit center valuation in the currency and valuation profile is only useful if Profit Center Accounting is active. In the Customizing settings for Profit Center Accounting, you define which valuation approach is used in PCA at the level of the controlling area. If you decided, in the currency and valuation profile, to work with the profit center valuation approach, you MUST select the profit center valuation approach in PCA. Otherwise, you can choose freely between the legal valuation approach and the group valuation approach. Note that, in Profit Center Accounting (PCA), you can only ever manage ONE valuation approach, in other words, the legal approach is no longer available in PCA if you are using the profit center valuation. (The local currency then corresponds to the currency type 12). If you require the update of the legal values to be structured according to profit centers in parallel, this must be executed in parallel in an FI-SL ledger with a structure that corresponds to PCA ledger 8A.
Please also note that, if the transfer prices are activated, it is not possible to update the transaction currency.
Customizing > SAP Reference IMG > Enterprise Controlling > Profit Center Accounting > Basic Settings > Maintain Settings for the Controlling Area.b) For the settlement with transfer prices, price determination must be set. Maintain the transfer price variant, the pricing procedures and the conditions. Create condition records for the transfer price conditions. For actual postings, only the transfer price variant “000” can be used.
Customizing > SAP Reference IMG > Enterprise Controlling > Profit Center Accounting > Transfer Prices > Basic Settings for Pricing and Advanced Settings for Pricing.
In order to analyze the transfer pricing during the activation phase or to detect incorrect settings, use the indicator “Condition Analysis” (Customizing -> … Basic Settings for Pricing and Advanced Settings for Pricing). This indicator activates the analysis for the entire system. Alternatively, you can set the SET/GET parameter DIA to X in the user master record, which activates the analysis for each user.
c) Define accounts for internal goods movements
As a result of settlement with transfer prices, additional postings are required in Profit Center for internal revenues, internal costs and changes in stock in order to ensure correct mapping. You must specify the accounts under which these postings are to be made.
Customizing > SAP Reference IMG > Enterprise Controlling > Profit Center Accounting > Transfer Prices > Settings for Internal Goods Movements > Account Determination for Internal Goods Movements.
d) Define account for production variances
When you use transfer prices for cross-plant production, a special account is required in order to settle production variances to the sending profit center rather than to the receiving profit center.
Customizing > SAP Reference IMG > Enterprise Controlling > Profit Center Accounting > Transfer Prices > Settings for Internal Gods Movement > Account Determination for Prod. Varian.
e) Define valuation approach clearing account
When using multiple valuation approaches/transfer prices, receivables and payables are only posted in the legal valuation view because the payment is made in this amount. However, if different valuations are posted for the offsetting account, the difference must be posted in valuation approach clearing accounts if it is to be reported in the consolidated financial statements. Maintain the valuation approach in Customizing -> SAP Reference IMG > Controlling > General Controlling > Multiple Valuation Approaches/Transfer Prices > Define Valuation Approach Clearing Account.
- Activate transfer prices
Activation of the currency and valuation profile represents the final step in the required Customizing settings. The currency and valuation profile must not be activated until you have made all of the Customizing settings required for the activation. Use the check function beforehand. Customizing -> SAP Reference IMG > Controlling > General Controlling > Multiple Valuation Approaches/Transfer Prices > Activation > Multiple Valuation Approaches: Check/perform the activation.
- Set the valuation areas as productive.
In this step, set the valuation areas that correspond to the plants as “productive”.
Menu > Accounting > Controlling > Product Cost Controlling > Actual Costing/Material Ledger > Environment > Production Startup > Set Valuation Areas as Productive.
Optional activities
Depending on your requirements, individual applications can now be included in the transfer price solution. The applications mentioned below are data-receiving modules and therefore do not affect inventory management or the results of the various valuation approaches For this reason, these modules can also be optionally provided with the data from the multiple valuation approaches.
- Transfer prices in product cost planning
The multiple valuation approaches in the material ledger can either be maintained manually or determined using product cost planning. Product Cost Planning offers the option of determining standard costs for each valuation approach (legal, group, profit center) and updating these in the ML For this reason, as of Release 4.0, three costing variants can be created in Customizing, which can determine the costs in each valuation approach and update the standard prices using the usual logic (allow marking, marking, allow release, release) from the corresponding views in the ML. The costing variant is assigned a costing type, which determines which valuation approach costing is carried out. The costing type similarly determines whether the standard price of the corresponding valuation approach can be updated by the costing variant.
Customizing -> SAP Reference IMG > Controlling > Product Cost Controlling > Product Cost Planning > Material Cost Estimate with Quantity Structure > Define Costing Variants and Costing Variant: Components > Define Costing Types.
When calculating the values for the profit center valuation approach, you need to take account of pricing when you change the profit center, as you would in the actual allocation. In the “Quantity Structure” folder, set the indicator for costing across profit centers. The costing version controls which transfer price variant from Profit Center Accounting is to be used as part of costing. Customizing > SAP Reference IMG > Controlling > Product Cost Controlling > Product Cost Planning > Selected Functions in Material Costing > Define Costing Versions.
The group costing saves the valuation differences from the legal and profit center valuations in additional cost components for the cost of goods manufactured. You must create these cost components for the cost of goods manufactured in addition to the usual cost components. You must also identify them as such on the detail screen for cost components for the cost of goods manufactured using the field “Delta Company Code” or “Delta Profit Center” field. Customizing > SAP Reference IMG > Controlling > Product Cost Controlling > Product Cost Planning > Basic Settings for Material Costing > Define Cost Component Structure.
In this step, you specify that the cost components of the material costing, sales order costing or order BOM costing are to be updated both in the currency of the company code, and in the currency of the controlling area. This processing requires that the indicator “All Currencies” is set as the control indicator for the controlling area. Customizing -> SAP Reference IMG > Controlling > Product Cost Controlling > Product Cost Planning > Selected Functions in Material Costing > Activate Cost Component Split in Controlling Area Currency.
- Transfer prices in Financial Accounting
In Financial Accounting, you have the option of managing additional multiple valuation approaches. The management of additional valuation approaches in financial accounting is handled the same way as the management of additional local currencies. The additional currencies that are managed are also assigned the dimension valuation. The legal valuation approach in the company code currency is mandatory because it is a prerequisite for the legal inventory valuation and thus for the legal settlement. If you decide to work with additional valuation approaches in Financial Accounting, the Customizing of the “additional local currency” must be set up in the basic settings in financial accounting for the relevant company codes. Here, you define which additional valuation approaches are updated and specify the additional ledgers in which the aggregated data is updated. The additional value approaches created in financial accounting must be the same as the valuation approaches stored in the currency and valuation profile. The consistency of the settings is checked when you activate the parallel valuation approaches. Customizing -> SAP Reference IMG > Financial Accounting > Financial Accounting Global Settings > Company Code > Parallel Currencies > Define Additional Local Currencies or Define Additional Local Currencies for Ledgers.
Benefit: FI transfers the currency translation for the parallel currencies and supplies PCA with lines in profit center valuation. The currency fields KSL and, if necessary, HSL are then transferred directly from the values delivered and do not have to be calculated in Profit Center Accounting. Basically, a calculation is only required if the currency types or currencies from the delivered currency lines do not match the settings in PCA (transaction 0KE5).
Advantage/disadvantage: The multiple valuation approaches are part of the FI document and are visible from the display of the FI document (transaction FB03) via the “Display Currency” button.
Advantage/disadvantage: For each additional valuation approach maintained in the parallel FI local currencies, a separate depreciation area MUST be created in Asset Accounting.
We recommend that you maintain the base currency 2 “Conversion from the first local currency” for the multiple valuation approaches. As amounts in multiple valuations are also always converted automatically using the exchange rate type ‘M’ in many SAP applications , you should similarly always maintain the exchange rate type ‘M’ in transaction OB22 for multiple valuation views.
- Transfer prices in Asset Accounting
If additional valuation approaches are managed in Financial Accounting, these MUST also be managed in Asset Accounting. For each additional valuation approach in Asset Accounting, you must create a separate valuation area. The valuation type is assigned a currency type, which defines the currency and the valuation
Customizing > SAP Reference IMG > Financial Accounting > Asset Accounting > Valuation > Depreciation Currencies > Define Parallel Currencies.
- Transfer prices in the profitability analysis.
Transfer prices in the profitability analysis are available only as of Release 4.5. Activating profit center valuation allows internal sales between profit centers (for example, stock transfers between two plants or material withdrawals) to be analyzed at transfer prices in the profitability analysis in addition to external sales. When you activate the profit center valuation, line items with profit center valuation are created in addition to the valuation approaches with legal valuation. As a result, the data volume is roughly doubled during the actual data update. However, the number of profitability segments remains unchanged.
a) In the Customizing settings for maintaining the operating concern, you define whether the profit center valuation is managed in CO-PA as an additional valuation approach When you generate the operating concern, the required data structures are then created for this. Customizing > SAP Reference IMG > Controlling > Profitability Analysis > Structures > Define Operating Concern > Maintain Operating Concern.
b) The group valuation approach is managed in the data structures of the legal valuation in additional value fields. To control the costs and revenues in the different view separately, you must create additional value fields and assign them to the data structures. The field contents must be filled using the CO-PA user exit, as an entry using value field assignment is not possible. The profit center valuation in updated in a separate ledger. No separate value fields are required.
c) Activate the partner profit center for use. Customizing > SAP Reference IMG > Controlling > Profitability Analysis > Structures > Segment-Lvl Characteristics.
d) Assign the value fields of the profitability analysis to the accounts for internal goods movements between profit centers (from transaction 0KEK). The quantities of the internal goods movements can similarly be transferred into the corresponding quantity fields. Customizing > SAP Reference IMG > Controlling > Profitability Analysis> Flows of Actual Values > Parallel Valuation Approaches/Transfer Prices > Assign Accounts for Internal Goods Movements.
e) Assign the SD conditions to the corresponding value fields in Profitability Analysis. Customizing > SAP Reference IMG > Controlling > Profitability Analysis > Flows of Actual Values > Transfer of Billing Documents.
f) The profit center valuation in profitability analysis must be activated for each controlling area. Customizing > SAP Reference IMG > Controlling > Profitability Analysis > Flows of Actual Values > Parallel Valuation Approaches/Transfer Prices > Activate Profit Center Valuation.
- Transfer prices in sales and distribution
Multiple valuation approaches can be used both for sales to external customers and for cross-company code sales with affiliated companies. For this purpose, you must include the condition types with the relevant control in the pricing procedures. The following condition types are provided:
Condition category “b” for conditions used to determine group production costs. The value from the material ledger is automatically read in the group valuation. Condition type delivered in the standard system: KW00.
Condition category “h” for conditions used to determine the profit center production costs. The value from the material ledger is automatically read in the profit center valuation. Condition type delivered in the standard system: PCVP.
Condition category “c” for the conditions used to determine the profit center prices. It is necessary to define the relevant prices. Condition type delivered in the standard system: PC00.
