Difference between cost center and work center.

Cost center is place where you incur your costs.

Work center is a place where an operation is performed by a person/machine (group).

Link between them:

The activities performed at or by the work center are valuated using charge rates which are defined/determined by cost centers and activity types.

Cash Discounts in SAP

Create a GL A/c of “Discount Allowed” under “Indirect Expenses”    (FS00), Assign Field status group :G001

Follow the below mentioned path to configure “Terms of Payment” (OBB8)

Image

Click on “Maintain Terms of Payment” ,The following screen Appears

Image

Click on “New Entries”, follow the next screen

ImageTerms of payment has been created,

Now we need to configure for Cash Discount (OBXI) or Follow below mentioned path

Image

In this step, you define the account numbers for your cash discount expense accounts. The system posts the cash discount amount to these accounts when clearing open items.

Note

Your specifications are dependent on the chart of accounts. You can additionally distinguish your specifications by tax code.

Activities

    1. Specify your accounts.
    2. Make sure that the accounts are created.

Chart of Accounts: “Company Code”

Click on “Accounts”

Image

Click on “SAVE

Now we need to “Modify Customer Master Data with Discount Term” (FD02)

  1. Select the “Customer”
  2. Click on “Company Code Data”
  3. Select “Payment Transactions”
  4. Terms of Payment : “Company Code”
  5. Click on “Save”.

Raise Sales Invoice Under F-22

Image

Retain the “Payment Term” to allow Discount or else delete the term not to allow the Discount

Post the entry.

Incoming Payment (F-28)

Image

fill the data as mentioned above with full amount

Press”ENTER”

Click on “Charge of Diff” ,the following screen appears

Image

Double click on Bank line item(HDFC Bank)

Amount: Modify Amount,100000*5%=5000

=100000-5000 =95000

Click On Document & Simulate, Finale entry ll be

Image

Automatic Creation of Primary and Secondary Cost Elements

Part of SAP Controlling module is Cost Element Accounting. It is under this area where you maintain directly master data of cost elements. Just to refresh your mind about cost element.

There are two types of cost elements in Controlling, namely; primary and secondary cost element. Primary cost elements are use to transfer P&L account postings in Financial (FI) to Controlling (CO). It is a requirement that all P&L accounts should have a primary cost elements; otherwise, transactions can not be posted involving P&L accounts in FI. On the other hand, secondary cost elements are use only for allocation and assessment purposes as period-end process.

Some might have created already a cost element. The question now is, how did you create the cost element? You could have created manually for each P&L Account. My dear readers, it’s really a tedious activity to create cost element manually.

Now here is the tip. You can create primary cost elements automatically for all P&L accounts. You just follow this procedure:

1. First, set-up the settings in your Chart of Accounts. Follow this configuration path:

IMG Financial Accounting (New) General Ledger Accounting (New) → Master Data → G/L Accounts → Preparations → Edit Chart of Accounts List.

Transaction Code: OB13

The “Change View List of All Chart of Accounts: Details ” screen appears.

Automatic Creation

Set the Controlling Integration to “2 Automatic creation of cost elements” (see highlighted item), and save your work.

2. Second step, Specify the default cost elements that will be automatically created. Follow this configuration path:

IMG Controlling → Cost Element Accounting → Master Data → Cost Elements → Automatic Creation of Primary and Secondary Cost Elements → Make Default Settings.

Transaction Code: OKB2

3. Third step, Create Batch Input Session for the automatic creation of cost elements. Follow this configuration path:

IMG Controlling → Cost Element Accounting → Master Data → Cost Elements → Automatic Creation of Primary and Secondary Cost Elements → Create Batch Input Session.

Transaction Code: OKB3

4. Fourth step, Execute Batch Input Session.

Transaction Code: SM35

Result: The cost elements specified in step 2 will be automatically created.

Activate Profitability Analysis – SAP

When you create a Controlling Area, Profitability Analysis is not automatically activated. If you want to use Profitability Analysis function of SAP, then it should be activated. Note that Profitability Analysis still not active upon creation of the Controlling Area, as shown in this screen shot:

To activate the Profitability Analysis, follow this helpful and effective instruction:

Transaction code: KEKE

Path: IMG Controlling Profitability Analysis Flows of Actual Values Activate Profitability Analysis.

The Change Veiew “CO-PA: Active Flag for Profitability Analysis”: Overview screen appears. Choose ’2 Component active for costing-based Profitability Analysis′, code for Profitability Analysis Active. Then save your entry.

Note that Profitability Analysis in the Controlling Area is now active,

Duplicate invoices function in SAP

In SAP FI module, when checking for duplicated invoices, the SAP system compares the following:

  • Vendor
  • Currency
  • Company code
  • Gross amount of the invoice
  • Reference document number
  • Invoice document date.

SAP OSS Note 305201 clarify this in a more detail below:

The following fields must be identical for Duplicate invoice check

Company code (BUKRS)
Vendor number (LIFNR)
Currency (WAERS)
Reference number (XBLNR)
Amount in document currency (WRBTR)
Document date (BLDAT)

If the SAP document is having any one of the above filled different then the SAP system does not consider it as a duplicate invoice and also It will check duplicate invoice check in vendor master data and in posting key is there check box selected for sales related

The setting you making in OMRDC

SAP Menu Path: Materials management -> Logistics Invoice Verification-Incoming Invoice -> Set Check for Duplicate Invoices

This configuration is only valid for SAP MM module and not FI invoices posted via FB60/FB65.

You should check the F1 help on field “Check double inv.” (LFB1-REPRF) in the relevant vendor master record through SAP transaction code: FK02.

Please also check, that message F5 117 has been set correctly in the SAP IMG using this path:

Financial Accounting -> Financial Accounting Global Settings ->Document -> Default Values for Document Processing -> Change Message Control for Document Control For Document Processing.

Then go to the relevant posting key is defined as sales related in SAP transaction code: OB41. You have to flag this field if the duplicate invoice check should work.

Configure Tax on Sales and Purchases

Introduction To Tax Configurations In SAP

Tax configurations are done in SAP at the country level. This is because all businesses in the same country need to follow the same taxation policies and generally accepted accounting principles while preparing their financial statements. Therefore, tax configurations in SAP are done for each country. Any company code which is then created in that country can then automatically use the tax configuration that is done for that country. So tax configurations need not be done for each and every company code again and again. This saves the effort required to carry out the tax configurations for every company code separately.

SAP allows the tax rates to be defined internally or the tax rates may be fetched from an external taxation system like Vertex. The tax configurations are stored in SAP in the form of tax calculation procedures and tax codes. These procedures can then be assigned to different countries. These procedures then become available to any company code which is created in that country.

The tax rates are provided by the tax codes are the different tax types while the method of calculation is defined in the tax calculation procedure. SAP allows the following taxes to be processed while posting documents:

  • Tax on sales and purchases.
  • Additional taxes like VAT which our country specific.
  • Sales and Use tax as in USA.
  • Withholding tax like income tax in India.

Concept Of Tax Jurisdictions

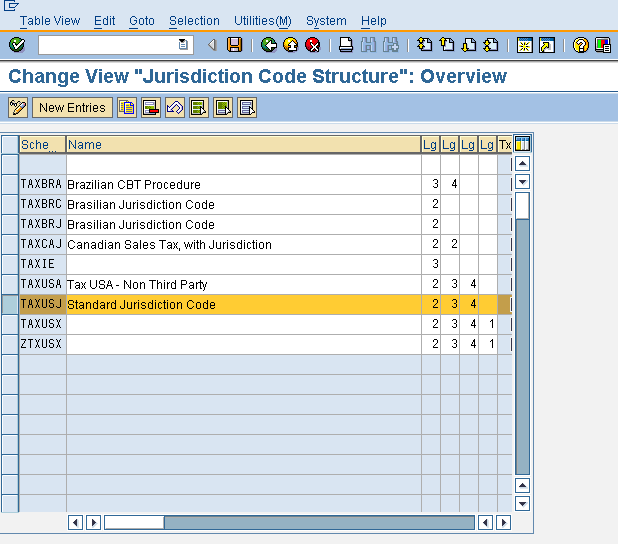
Tax jurisdictions represent the government authorities to which the taxes are paid. SAP allows up to 4 levels of tax jurisdictions representing state, county, city and others. The tax jurisdiction structure needs to be defined before the tax jurisdictions can be created in SAP. As mentioned before, the tax jurisdiction structure can have four levels. The tax jurisdiction structure defines the length of characters which will be used to represent each level in the tax jurisdiction code. The tax jurisdiction code structure needs to be defined for every tax calculation procedure.

Once the tax jurisdiction code structure has been defined, the next step is to create the actual tax jurisdiction codes. The tax jurisdiction codes need to be created for every government authority to which the tax needs to be paid.

Assign Tax Procedure To Country

Step 1: The tax configuration details are stored in the tax procedure. The first step is to assign the tax procedure to the country in which the company code exists. Navigate to the Implementation Guide menu path as shown below or execute the transaction code OBBG.

Navigate To The Img Path Shown


Step 2: Position to the country to which the tax calculation procedure is to be assigned and enter the tax calculation procedure details as shown in the screenshot below.

Assign The Tax Calculation Procedure To The Country


Step 3: Click on the save button to save the changes. A success message showing that the changes have been saved is displayed.

Define The Tax Jurisdiction Code Structure

Step 1:Navigate to the implementation guide menu path as shown in the screenshot below or execute the transaction code OBCO from the SAP easy access menu.

Navigate To The Menu Path Shown


Step 2: Select the tax procedure for which the tax jurisdiction code structure needs to be defined and enter the length for the various jurisdiction levels as shown in the screenshot below. The length chosen should be sufficiently large to accommodate enough tax jurisdiction codes as per the requirement. For e.g. the first level represents the state. If the number of states is large then it is better to have a four letter key to represent it rather than having a two letter key. This is because the number of combinations possible with a four letter key will be much more than those possible with the two letter key.

Enter The Tax Jurisdiction Code Structure


Step 3: Click on the save button to save the changes. A success message indicating that the changes have been saved is displayed.

Define The Tax Jurisdiction Codes

Step 1:Navigate to the implementation guide menu path as shown below or execute the transaction code OBCP from the SAP easy access menu.

Navigate To The Menu Path Shown


Step 2: Enter the work area details in the pop-up as shown in the screenshot below and click on the continue button.

Enter The Work Area


Step 3: Enter the tax jurisdiction code and its description as shown in the screenshot below. On the basis of the configuration for the tax jurisdiction code structure, the first two letters of the tax jurisdiction code will represent the state, the next three letters will represent the county, and the next four letters will represent the city. Therefore, every tax jurisdiction code will be nine characters long. It will be possible to determine the correct taxing authority on the basis of the tax the jurisdiction code described above.

Enter The Tax Jurisdiction Code


Step 4: Click on the save button to save the new tax jurisdiction code. A success message indicating that the new tax jurisdiction code has been saved is displayed.

Define Tax Codes

The tax codes are defined for each and every country. The tax codes contain the actual rates to be used while calculating the tax on the basis of the tax calculation procedure. Each country can have multiple tax codes for different types of taxes like input tax sales and purchases, output tax on sales and purchases, etc.

Step 1:Navigate to the Implementation Guide menu path as shown in the screenshot below or execute the transaction code FTXP from the SAP Easy Access menu.

Navigate To The Menu Path Shown


Step 2: Enter the country in the pop -up as shown in the screenshot below and click on the continue button.

Enter The Country


Step 3: Enter the tax jurisdiction code and the other details on the screen as shown in the screenshot below and press the Enter key. The tax code represents the type of the tax for which the rates are going to be maintained.

Enter The Details As Shown Above


Step 4: Enter the tax rates as shown in the screenshot below. These tax rates can be used to calculate the tax while posting a document in SAP. The method of calculation will be determined on the basis of the tax calculation procedure.

Enter The Tax Rates


Step 5: Click the save button to save the changes. A success message indicating that the changes have been saved is displayed.

Configure Extended Withholding Tax

SAP system provides two procedures for processing withholding tax; the “Standard” and the “Extended” withholding tax. We’ll walk you through on the basic configuration steps of the latter procedure.

1. First, Check Withholding Tax Countries:

Path: IMG → Financial Accounting (New) → Financial Accounting Global Settings (New) → Withholding Tax → Extended Withholding Tax → Basic Settings → Check Withholding Tax Countries.

The “Change View Country Key for Withholding Tax: Overview” screen appears. To create new entry, you may copy an existing country key by selecting the Copy button or you may create from scratch by selecting New Entries button.

Fill up the following fields:

  • Country Key (Cty) – e.g. PH
  • Withholding Country Key (WCty) – e.g. PH
  • Description – e.g. Withholding Tax – Philippines

2. Second, Define Withholding Tax Keys. These are codes use to identify the different withholding tax types of each country.

Path: IMG → Financial Accounting (New) → Financial Accounting Global Settings (New) → Withholding Tax → Extended Withholding Tax → Basic Settings → Define Withholding Tax Keys.

A pop-up window “Determine Work Area: Entry” appears. Enter your country code, e.g. ‘PH’. Then select Enter button or press Enter on your keyboard.

The “Change View Official Withholding Tax Key – Descriptions: Overview” screen appears. To create new entries you may copy an existing tax key by selecting Copy button or you may create from scratch by selecting New Entries button.

Fill up the following fields:

  • Official Withholding Tax Key (Off. Key) – e.g. ‘C010′.
  • Text 40 (Name) – Professional talent fee paid to juridical person <=720,000.

3. Third, Define Withholding Tax Type. Note that with “Extended Withholding Tax Procedure”, withholding tax can be computed by the system during invoice processing or during posting of payments. Furthermore, the withholding tax on partial payments can also be computed or determined by the system automatically.

Path: IMG → Financial Accounting (New) → Financial Accounting Global Settings (New) → Withholding Tax → Extended Withholding Tax → Calculation → Withholding Tax Type → Define Withholding Tax for Invoice Posting (or for Payment Posting).

A pop-up window “Determine Work Area: Entry” appears. Enter your country code, e.g. ‘PH’. Then select Enter button or press Enter on your keyboard.

The “Change View Define Withholding tax type: Posting at time of invoice” screen appears. On the said screen, you may create through copy an existing tax type or you may create from scratch. Select the Copy button or New Entries button.

Fill up the Withholding Tax Type and Description fields. All other fields are already standard and more or less fit to your withholding tax requirements in your country.

4. Fourth, Define Withholding Tax Code. The tax code you create in this step should be assigned to the withholding tax type and withholding tax key created from the preceding steps. Furthermore, you enter also the tax rate and the base amount of computation.

Path: IMG → Financial Accounting (New) → Financial Accounting Global Settings (New) → Withholding Tax → Extended Withholding Tax → Calculation → Withholding Tax Code → Define Withholding Tax Code

A pop-up window “Determine Work Area: Entry” appears. Enter your country code, e.g. ‘PH’. Then select Enter button or press Enter on your keyboard.

The “Change View Withholding tax code: Details” screen appears. You may copy an existing tax code or you may create from scratch.

Fill up the following fields:

  • Withholding tax type – assign a withholding tax type you’ve created in step 3.
  • Withholding tax code – create your withholding tax code.
  • Description – Enter description of your withholding tax code.
  • Official Withholding tax key – assign a withholding tax key you’ve created in step 2.
  • Percentage subject to tax (Base amount) – normally, 100% of the base amount is subject to tax.
  • Posting indicator – normally select ’1′ which means, there is one line item entry for the withholding tax and the amount is deducted fromt the line item of customer, vendor, or cash account.
  • Withholding tax rate – enter the tax rate of the tax code. This will use by the system to compute the amount of tax during processing.

5. Fifth, Assign Withholding Tax Types to Company Codes. Here, you assign the withholding tax types created in step 3 to your Company Code.

Path: IMG → Financial Accounting (New) → Financial Accounting Global Settings (New) → Withholding Tax → Extended Withholding Tax → Company Code → Assign Withholding tax type to Company Code.

The “Change View Withholding tax information for company code per w/tax type” screen appears. You may copy an existing company code assignment or you may assign from scratch.

6. Sixth, Activate Extended Withholding Tax for your Company Code. Remember, the activation of this tax procedure is on the company code level. You can’t use this tax procedure to your company code, unless activated.

Path: IMG → Financial Accounting (New) → Financial Accounting Global Settings (New) → Withholding Tax → Extended Withholding Tax → Company Code → Activate Extended Withholding Tax.

The “Change View Enhanced withholding tax functions active: Overview” screen appears. To activate, tick the check box “Ext. w/tax” of your company code.

7. Finally, Define G/L Accounts for Withholding Tax. In this step, you assign the G/L account for Withholding tax posting.

Path: IMG → Financial Accounting (New) → Financial Accounting Global Settings (New) → Withholding Tax → Extended Withholding Tax → Posting → Accounts for Withholding Tax → Define Accounts for Withholding Tax to be Paid Over.

A pop-up window “Enter Chart of Accounts” appears. Enter the Chart of Accounts code then select Enter button or press Enter on your keyboard.

The “Maintain FI Configuration: Automatic Posting – Accounts” screen appears. Select the G/L account you want to assign for withholding tax postings.

Note, for every step above don’t forget to save your work. Select Save button or Ctrl+S after each step.